How to build a custom mechanical keyboard
- December 13, 2022
- by
- Xavi
Are you an avid fan of mechanical keyboards but need help finding one that meets your specific needs? Then why not have a go at building a custom mechanical keyboard? You don’t need to be a master craftsman to construct a unique and durable mechanical keyboard – with some patience and knowledge of the necessary components. You, too, can create the perfect keyboard.
Introduction to mechanical keyboards and their benefits
Mechanical keyboards are the ultimate choice for gamers and tech enthusiasts. With solid construction, customizable features, and tactile feedback, mechanical keyboards take typing to a new level. Whether you’re a professional esports player or just looking to upgrade your home office setup, understanding the basics of mechanical keyboards is vital.
Unlike traditional membrane keyboards that have flat keys with little feedback when pressed, mechanical keyboards feature individual switches for each key. When pressed down, these switches provide tactile feedback and faster response times than membrane models – making them ideal for gaming and other activities where speed is essential. In addition to providing superior performance in responsiveness and durability, mechanical keyboards also offer plenty of customization options in switch type, keycap design, backlighting effects, and more.
If you’re a typist, programmer, or just someone who enjoys the tactile feel of a keyboard, then a mechanical keyboard is worth considering. Mechanical keyboards offer several benefits over traditional keyboards, such as improved typing experience and accuracy, customization options, and durability.
Typing on mechanical keyboards provides an incredibly satisfying experience due to the tactile feedback that stems from their switches. Unlike traditional keyboards, which use membranes for actuation (the point at which a key press is registered), mechanical switches require much less force to be pressed down and provide audible clicks. This allows for faster typing speeds as well as more accurate input of data – especially when it comes to gaming applications. Additionally, most mechanical keyboard models are highly customizable, with various types of switches available for purchase – allowing users to tailor their own unique typing experience.
Identifying the necessary components for a custom mechanical keyboard
Building a custom mechanical keyboard is an enjoyable and rewarding experience, but it can also be daunting if you are unfamiliar with the components needed. Knowing the primary parts of a mechanical keyboard will ensure that your build experience is successful.
The necessary components for a custom mechanical keyboard include the following:
Keyboard case
A Custom Mechanical Keyboard is an excellent way to take your gaming and typing experience to the next level. It provides a unique set of advantages far superior to any traditional keyboard, such as tactile feedback, quick response time, and individual key customization. But before enjoying these benefits, you need a particular case for your custom keyboard.
When selecting a keyboard case, there are several important factors: size, compatibility with the motherboard’s socket type, water resistance, dust protection, and air circulation. Different points come in various lengths depending on the number of keys your board has. Additionally, different sockets require different mounting styles; make sure that the casing you choose matches the socket type that fits your mechanical keyboard model.
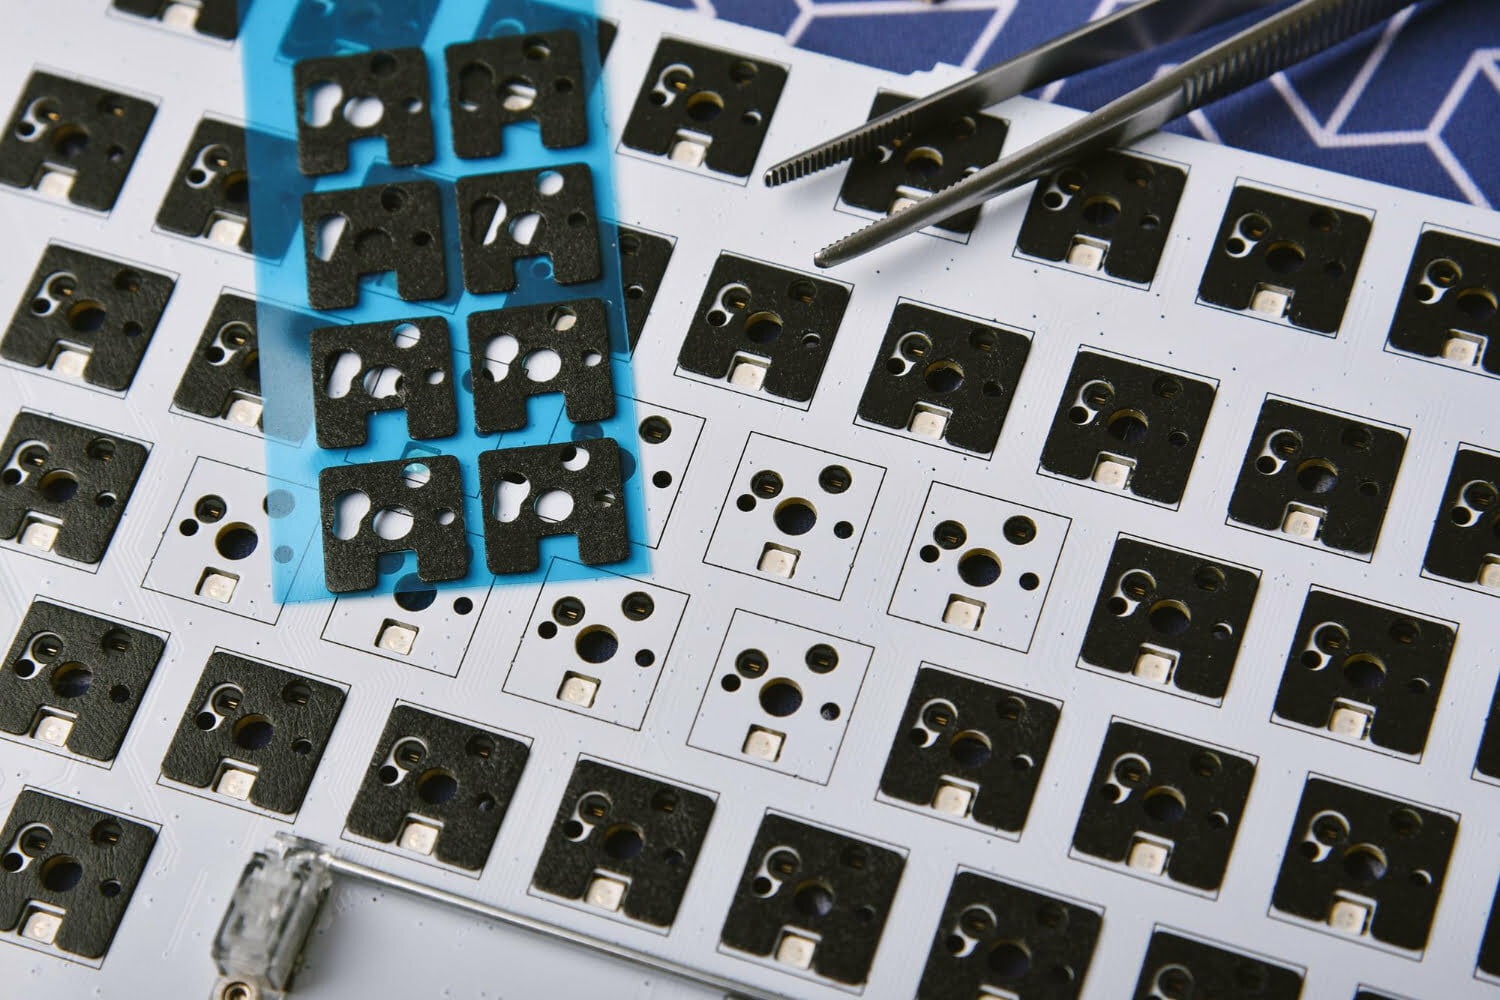
PCB (printed circuit board)
The printed circuit board (PCB) is a crucial component of any custom mechanical keyboard. It serves as the foundation for the electrical components, providing a secure and consistent platform for their installation. Additionally, it allows for easier organization and traceability to ensure that all connections are correctly made between each part of your build.
Keycaps
The term “keycaps” refers to the removable plastic caps on top of each key switch in a mechanical keyboard. Switching out these keycaps is one of the most exciting aspects of building your mechanical keyboard. With so many colors, shapes, and materials, it can take time to decide which ones are right for you. However, with this guide, you can learn how to pick out the perfect set of custom keycaps that will make your custom mechanical keyboard genuinely unique.
When selecting custom keycaps for your build, consider both aesthetics and comfort. Aesthetically speaking, there are a variety of colors and designs available that can suit any style preference or desired look. Regarding comfort, some materials provide a better grip or feel more pleasant than others when typing or gaming.
Switches
Switches are the heart and soul of a mechanical keyboard. Without them, the keys would be lifeless pieces of plastic. Choosing the right switch is essential if you’re looking to build your custom mechanical keyboard – it can make or break your typing experience. But how do you go about selecting the perfect switch?
There’s no one-size-fits-all answer when choosing a switch for a custom mechanical keyboard. The type of switch you choose will depend on factors like your preferred keystroke, sound level, and tactile feedback. Three main types of switches are available: linear, clicky, and tactile.
Stabilizers
For those looking to upgrade their typing experience, mechanical keyboards are the way to go. While often pricier than traditional keyboards, they provide superior performance and feel for those who use them often. But what is a mechanical keyboard, exactly? It’s typically composed of switches, stabilizers, and keycaps mounted on a printed circuit board. Stabilizers are an integral part of any custom mechanical keyboard build.
Stabilizers help ensure that each keycap sits correctly on the switch below it and prevent it from wobbling around as you type. They come in different sizes depending on how wide the keycap is. Most stabilizers consist of two parts: a plastic bar that fits into slots in the sides of your switch plate; and another plastic piece that holds the keycap in place on top of the switch itself.
The keyboard case houses all the other components and ensures they stay in place while also providing protection. A PCB is a printed circuit board that allows for connection between the keycaps, switches, and stabilizers to create the functionality within the keyboard. The keycaps attach to each switch, giving tactile feedback when pressed and identifying what action will be taken upon pressing each keycap.
Choosing and purchasing the components
Building your custom mechanical keyboard can seem daunting, but it doesn’t have to be. The key to success is in the details and careful planning. Researching and comparing different components, deciding on a budget, and purchasing from reputable retailers are essential for choosing and buying the parts you need for your custom keyboard.
Before you start shopping around:
- Take some time to research what components will best fit your needs.
- Consider the board size, switch types, and space available for extra keys or features like macro programming or lighting effects.
- Once you’ve narrowed down what kind of components you’ll need, compare prices between retailers to find the best deal that meets your budget.
It’s important to remember that quality should always come before cost when investing in custom hardware.
Assembly process
The assembly process begins with gathering all of your components. This includes the parts that make up your mechanical keyboard and any additional accessories or tools you may need, like a keycap puller. Once you have everything in hand, it’s time to start piecing it together piece by piece, following instructions carefully.
Preparing the workspace and gathering tools
To begin with, clear out any clutter from the area, so there’s plenty of room to work. Have all your necessary items close at hand, such as screws, screwdrivers, soldering iron and solder, keycaps, switches, and other parts needed for assembly. This will make it easier to find what is needed without having to hunt around in different places for them during the build process.
Mounting the PCB and soldering switches
The PCB (Printed Circuit Board) is what most components are mounted onto, making it an essential part of any keyboard build. This includes diodes and other electrical components that help with signal routing and controller chips that handle keypresses. After all parts have been placed on the board, it can be secured into its case using screws or standoffs. Once secure, soldering switches into place will complete this crucial step of construction.
Installing stabilizers and keycaps
Installing stabilizers and keycaps is crucial when building your custom mechanical keyboard. Stabilizers support larger keys, like the space bar, shift, and enter keys, to ensure that they don’t wobble when you press them. Keycaps are the plastic covers that fit over each of the individual switches on your keyboard – these come in various materials and designs, so it’s essential to choose carefully. To help you get started, here’s how to install stabilizers and keycaps on your new custom mechanical keyboard. With this guide, you can ensure that your new keyboard looks as good as it feels!
Testing and troubleshooting
Testing and troubleshooting are essential steps in building your custom mechanical keyboard. To ensure a smooth experience, you should always test out the parts of your keyboard before putting it together. This will help to catch any errors that could cause problems down the line.
To begin testing, start by connecting all of the individual components. After this is done, you can turn on each component individually to ensure they are working properly and can communicate with each other correctly. You should also check for loose connections or compatibility issues between different parts. Once you have verified that everything works perfectly, you can assemble your custom keyboard.
Troubleshooting any problems that may arise during the building process is crucial to ensuring that your custom mechanical keyboard runs smoothly once it’s complete.
Conclusion
At the end of the journey, after a custom mechanical keyboard has been successfully built from individual components, there is nothing quite like enjoying completing a project with your own two hands. Now that it has been assembled and tested, users can enjoy all its glory and take pride in their accomplishments.
Once they have settled into using the new board and exploring its features, users can further customize their keyboards by adding lighting or experimental firmware to improve performance. With plenty of options available online regarding lighting kits and open-source firmware choices, building a custom mechanical keyboard opens up an exciting world of tinkering opportunities for its owners. For those looking to make their board even more unique and personalize it even further than before, these are great ways to do so without needing to purchase additional components or starting again from scratch.
You may also Like

Logitech MX Master 3s: Precision Redefined

Nostalgic Retro Gaming: Exploring Classics
